The first 10 things to do with your new Windows 11 PC
Whether it’s a gift from a loved one or something you got for yourself, getting a new Windows PC is always exciting. There’s always a bit of a rush using it for the first time, even if you’re not a big computer guy like most of us here at XDA. But once you’ve turned on your shiny new PC, what should you do? To help you out, we’ve come up with the 10 first things you should do with your new Windows PC, specifically if it’s running Windows 11.
Admittedly, many of these steps are subjective; you don’t have to do all of this, but we’d recommend it if you want to get the best experience. Let’s get into it.
Navigate this article:
- Check for updates
- Clean up your taskbar and Start menu
- Uninstall bloatware
- Disable unnecessary startup apps
- Bonus: Merge the partitions on your drive
- Change the look of Windows 11
- Enable clipboard history
- Manage your notifications
- Set up OneDrive
- Install your browser of choice
- Install your favorite apps
Check for updates
It can be annoying, but keeping your computer up to date is important, particularly for security reasons. It can also add new features to your PC, and if your new PC is still running Windows 10, you can get Windows 11 this way, too. To get the latest updates for Windows, open the Settings app (from the Start menu, for example) and go to the Windows Update (on Windows 11)/Update & Security (Windows 10) page and click Check for updates.
Any updates that are available will begin downloading and installing. Some of them may require you to restart your PC, and we recommend checking back once the updates have installed, as new updates may show up. If you’re on Windows 10 and you want to upgrade to Windows 11, you may want to check out this article on how to get Windows 11 right now.
You may also want to update the apps that come pre-installed with Windows, which update separately using the Microsoft Store. To do this, open the Microsoft Store app then click the Library page in the bottom left corner. Here, click Get updates and wait it out. Almost all the preinstalled apps are likely to have updates, so this process may take a while.
With that out of the way, you’ll have all the latest security improvements and features available.
Clean up your taskbar and Start menu
When you first set up Windows 11, you may see a lot of icons pinned to your taskbar and Start menu. Some of them are useful, and some of them aren’t, so it’s a good idea to clean up and remove anything you don’t need from your sight. Let’s start with the taskbar.
Right off the bat, Windows 11 includes a few icons on the taskbar, including Task View, Search, Widgets, and Chat (powered by Microsoft Teams). You may also see your browser and some apps pinned here. To remove the Windows 11 icons we just mentioned, right-click an empty area of the taskbar and click Taskbar settings. You’ll see a settings page that lets you disable or enable the icons for Windows features.
To remove apps pinned to the taskbar, simply right-click their icon and click Unpin from taskbar.
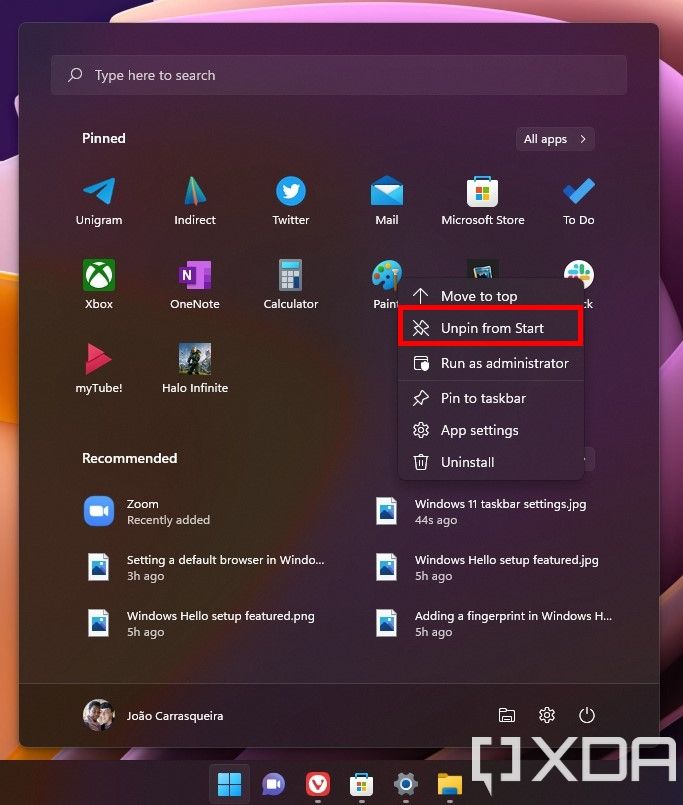
As for the Start menu, you’ll see a few apps pinned to the main page when you open it up, many of which you might not want. Simply right-click the icons of the apps you don’t care about and choose Unpin from Start. You can also click Uninstall if you don’t want the apps on your PC at all.
And speaking of uninstalling apps…
Uninstall pre-installed software
Windows PCs traditionally come with a whole lot of pre-installed software. Windows 11 itself includes a lot of apps out of the box, but if you got a new PC, there’s a good chance that the manufacturer also installed a ton of things you don’t care about.
What you need and don’t need is up to you, of course, and the best thing you can do is go through your list of apps and see if you find them useful. Open the Start menu and click All apps to see everything that’s installed on your PC. If you see an app you don’t recognize, you can open it to see if it’s worth anything to you, and then keep it or uninstall it. To uninstall an app, right-click it and select Uninstall. If the app is available and updated through the Microsoft Store, it will be uninstalled right away. If it’s a “classic” app from outside of the store, you’ll be taken to the Control Panel, and there you have to select the app again and click Uninstall.
We do advise you to look out for apps that might help your PC function as intended, though. Some manufacturers include their own update tools for drivers, and you might not want to uninstall that. It’s also a good idea to look up the name of the software if you’re unsure whether you should remove it or not.
Disable unnecessary startup apps
Even if you choose to keep certain apps, you may not always want them to start with your PC. Having apps run on startup can make your computer take longer to boot, plus those apps might be using resources when you don’t need them to. To see the apps that are currently starting with your PC, right-click the Windows icon on the taskbar and choose Task Manager. Here, click More details (if you haven’t already) and switch to the Startup tab.
You can disable the apps that you don’t need all the time so our PC starts a little faster. If you notice something stops working, you can always go back and re-enable the apps. It’s also a good idea to come back here after installing new software, as some programs can create startup tasks you don’t need. For example, Steam likes to start with Windows, but I personally always disable this since I only use it occasionally.
Bonus: Merge partitions on your drive
We made this one a bonus because it’s not really a big deal, and there is some risk involved if you don’t know what you’re doing, but I personally find it very annoying. Here’s the thing: many PC manufacturers like to divide the hard drive in your PC into partitions. At the end of the day, partitions work similarly to folders, but there’s really no benefit to having multiple partitions on your drive unless you plan to dual-boot Windows with another operating system. In fact, it might leave you in a situation where your disk technically has enough space to install a program or game, but because that space is in different partitions, it won’t install.
To check if your PC has multiple partitions, right-click the Windows icon on your taskbar and click Disk Management. You’ll see a list of disks and partitions on your PC, including the partitions in each disk. Keep in mind the main disk in your PC will have multiple partitions that are required for Windows to work. Some PCs may also have multiple disks; those are physically separate, so you can’t merge them.
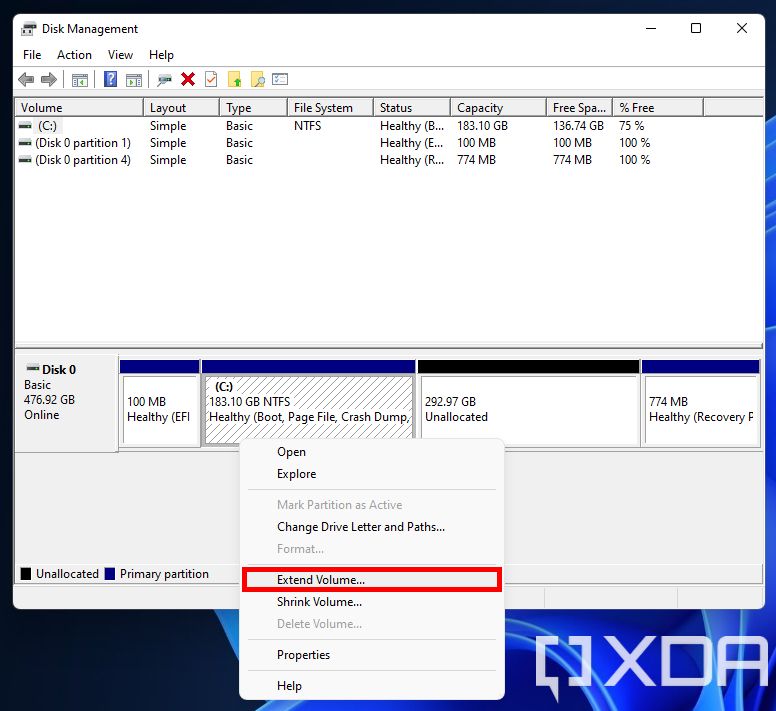
What you’re looking for here is a partition that’s likely labeled as D: (it may also be called Data, for example), and which probably is upwards of 100GB in size. If you don’t see it, your PC doesn’t have multiple partitions, you’re good to go. The D: volume should also be on the right next to the C: volume on the diagram at the bottom for this to work. Here’s what it should look like (aside from names and specific sizes):
If you do see it, first open File Explorer and make sure that drive is empty or has nothing useful in it. Don’t do anything if you’re not sure. If it is empty, go back to Disk Management, and right-click the empty (D:) drive, then click Delete volume. That space will now be labeled as unallocated. Now, right-click the C: volume and click Expand volume. A window will appear to guide you through the process, and the unallocated space will automatically be selected.
 Simply click through the guide and your C: drive will now take up the entire available space on the disk.
Change the look of Windows 11
Windows 11 gives you a few ways you can customize the way it looks, so it caters to your style specifically. To change how your PC looks, open the Settings app and then choose the Personalization page. Here, you’ll see all the options you can change. Right off the bat, you can choose from a few preset themes at the top of the page, which change your background image and theme colors. You have individual options listed below that, though.
The Background options lets you change the background of your desktop, including setting slideshows. The Colors page lets you choose between light and dark themes, as well as choose an accent color, which can be pretty much anything you want. The Themes page includes packages that change both of these settings, plus things like sounds and the mouse cursor. You can explore all of these at your leisure, though we’ve also covered these pages extensively in our deep dive of the Windows 11 Settings app.
We’ll highlight one particular option, which is in the taskbar personalization settings. You can move the icons, which are centered by default, back to the left corner of the screen as previous Windows versions had.
Enable clipboard history
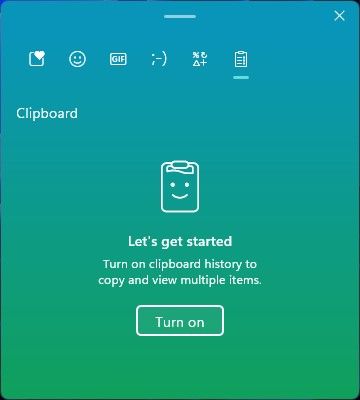
Copying and pasting items is something we’re all used to doing, but being able to only have one item in your clipboard at a time can be annoying. Windows 11 (and 10) fixes, this, though. You can keep multiple items in your clipboard if you enable clipboard history. Press Windows key + V and the clipboard history window will open, but it’s disabled by default. Click Turn on and it will be enabled from that point forward. Whenever you want to access items in your clipboard history, click press Windows key + V again to bring it up and click the item you want to copy.
As a little guidance from us, once you select an item in the clipboard history, that will become the item you can paste using Ctrl + V until you choose a different item or copy something else. This can be useful if you want to paste something multiple times. Do keep in mind that the clipboard history resets when you restart or turn off your computer.
Manage your notifications
Out of the box, almost every app that’s installed on your PC can send you notifications, and that might be a little overwhelming. If you want to control which apps can send notifications and how those notifications work, head into the Settings app and in the System page (it opens by default) choose Notifications. Here you’ll see general notification settings as well as all the apps on your PC that can send you notifications. You can change the settings for all of them to suit your needs.
If you scroll to the bottom of this page you’ll also find two important options for Windows notifications and tips that are supposed to help you use your PC. If you don’t find these helpful, you can disable them here, too.
Set up OneDrive
OneDrive is Microsoft’s cloud storage service, and it’s integrated with Windows 10 and 11 out of the box. When you first turn on your computer, you’re already asked to set it up, and it’s automatically connected if you sign in with your Microsoft account. If you want to change your settings, click the corner overflow icon (the arrow icon) on the right corner of your taskbar and then click the OneDrive (cloud) icon. This will open the OneDrive flyout.
Here, you can sign in if you haven’t already, or you can access your OneDrive settings with the Help & settings button. Click it and then choose Settings. Here you can find a few important settings across different tabs.
Starting with the Settings tab, one feature you’ll probably want to enable is Files On-Demand. This allows you to see your OneDrive cloud files in File Explorer, even if they’re not stored on your PC. When you want to use them, they’ll be downloaded and saved locally, while also syncing to the cloud, so you can always access them from anywhere. In the Account tab, you can choose which folders are available on your PC. Click the Choose folders button to select what you want to be available. If you enabled files on-demand, files won’t be downloaded until you open them.


A few more important Settings are in the Backup tab. The first option here allows you to backup files from important folders on your PC – Pictures, Documents, and Desktop – to your OneDrive storage. This helps you ensure these files aren’t lost if your computer gets lost or stolen. The Photos and videos option lets you automatically back up media from devices you connect to your PC, like SD cards or phones. Finally, the Screenshots option lets you automatically save screenshots from your PC (taken with Windows key + Print Screen) to OneDrive.
Install your web browser of choice
The web browser is arguably the most important app on your PC. Almost everything we do now is based on the web, so it’s the app you probably care about the most. By default, Windows 11 comes with Microsoft Edge, which is, in our opinion, a great browser already. But if you’re more used to Google Chrome or something else, you might want to switch. You can download your favorite browser using the links below:
- Download Google Chrome
- Download Mozilla Firefox
- Download Opera
- Download Vivaldi
- Download Brave Browser
Setting your browser as the default may be tough in Windows 11, though. To change your default browser, you’ll need to go to the Settings app and choose the Apps section. Then click Default apps. Here, you’ll see a list of all your apps. Scroll down to find your preferred browser and you’ll see a list of extensions and link types your browser supports, most of which will be assigned to Microsoft Edge.
To make it your default browser, you’ll need to select the HTTP option and set it to your new browser. You may also want to do this for .html, .htm, and .pdf extensions. If you use features like Windows Search or the Widgets panel, you may also want to use MSEdgeRedirect. This app redirects links from these areas, which usually only open in Edge, to your default browser.
Install your favorite apps
Finally, this goes without saying, but one of the things you’ll want to do is install the apps you care about the most. This is entirely up to you, so of course we can’t really tell you what to install here, but if you’re looking for recommendations, we have a forum thread for exactly that. We asked our readers to choose the first five apps they install on Windows, so you can hear what the community has to say. A personal favorite of mine is Unigram, a Telegram client built specifically for Windows 10 and 11.
You can install apps from the Microsoft Store or anywhere on the internet. If you find yourself unable to install apps from the internet, your PC may have come with Windows 11 in S mode. Go the Settings app and scroll down to the Activation page, then choose the option that says Switch to Windows 11 Home or Switch to Windows 11 Pro (not where it reads Upgrade your edition of Windows). You’ll be taken to the Microsoft Store to switch out of S mode so you can install apps from anywhere.
These are what we’d consider the most essential things you can do when you first use your brand-new Windows PC. They may not seem like the most important things right away, but these steps can help ensure that your experience will be as seamless as possible. You won’t have to deal with unnecessary notifications, have your PC filled with apps you don’t want, or use a browser you don’t like. From here, you can use your PC to your heart’s content, and it will be a much better experience than it would be otherwise.
If you haven’t bought a new PC yet, check out our roundup of the best laptops you can buy today to find yourself something nice. Something else you might want to do is look for a good webcam for your video calls and meetings, since many laptops still have subpar cameras.
The post The first 10 things to do with your new Windows 11 PC appeared first on xda-developers.
from xda-developers https://ift.tt/32Elg8m
via IFTTT


Aucun commentaire: